What is Robots.txt?
Imagine you own a large library with thousands of books, but some rooms are private and not open to the public. To make sure visitors and staff know which areas they can access and which are off-limits, you put up signs at the entrances to restricted rooms.
In the world of websites, search engines like Google and Bing are like visitors to your library. They send out “spiders” to crawl through your site and index its content so people can find it when they search online. However, there might be parts of your website that you don’t want these spiders to crawl, like private sections, admin pages, or duplicate content.
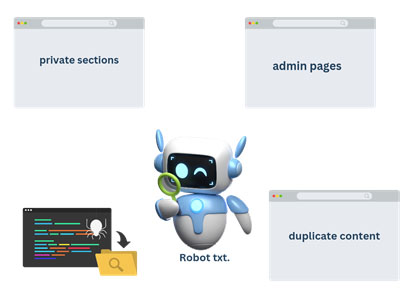
This is where the robots.txt file comes in. It’s like those signs you put up in your library. You place this file in your website’s root directory, and it tells the search engine spiders where they are not allowed to go.
For example, say you have a website with a private members-only area and an admin section. Your robots.txt file might look like this:
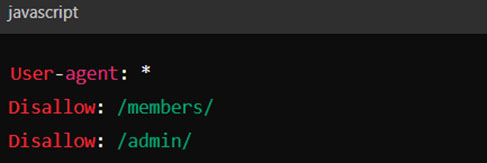
This means that all search engine spiders (User-agent: *) are instructed not to crawl or index any pages in the /members/ or /admin/ directories. By setting up a robots.txt file, you ensure that search engines focus on the parts of your site you want to be visible to the public, keeping the rest private and secure.
What is the importance of Robots.txt?
Many websites don’t need a robots.txt file. Google usually finds and indexes all important pages on your site automatically, ignoring duplicate or unimportant ones. However, there are three main reasons you might still want to use a robots.txt file.
First, you may have non-public pages you don’t want people to find through a search engine. For instance, imagine you run an online store with a staging area for testing new features or a login page for administrators. You don’t want random visitors landing on these pages. By using a robots.txt file, you can block search engines from indexing these pages. This way, your staging and login pages won’t appear in search results, keeping them more secure and private.
Second, managing your crawl budget is crucial if you have a large website. Google assigns a crawl budget to each site, which is the number of pages Googlebot will crawl and index during a given period. If you have many unimportant pages, they can waste your crawl budget. For example, let’s say you have a blog with hundreds of old, irrelevant posts. By blocking these old posts in your robots.txt file, you ensure Googlebot spends more time crawling your valuable, current content. This helps the important pages get indexed faster and appear in search results.
Third, while meta directives can prevent pages from being indexed, they don’t work well for multimedia resources like PDFs and images. Let’s say your website hosts several PDF documents and images you don’t want to show up in search results. By using a robots.txt file, you can prevent Google from indexing these resources, keeping them out of search results and helping you manage your site’s content more effectively.
In short, a robots.txt file tells search engines which pages or resources they should not crawl. For example, let’s say you run a travel blog and notice in Google Search Console that many old, irrelevant pages are indexed. To fix this, you check your indexed pages in Google Search Console and compare the number with the pages you actually want indexed. If you find more pages indexed than expected, with some you didn’t want public, it’s time to create a robots.txt file.
To summarise, while many sites don’t need a robots.txt file, it can be handy for:
- Blocking non-public pages.
- Maximising your crawl budget.
- Preventing indexing of certain resources.
Using a robots.txt file strategically ensures your important pages get the attention they deserve, keeping your site’s indexing clean and efficient.
Some of the best practices that you can follow
Creating and managing a robots.txt file is crucial for guiding search engine bots on how to interact with your website. Here are some best practices to ensure your robots.txt file is effective and error-free:
1. Keep it Simple and Clear
Your robots.txt file should be straightforward and easy to understand. Use simple rules to tell bots which parts of your site they can and cannot access. Avoid overcomplicating with too many directives.
2. Place it in the Root Directory
Always place your robots.txt file in the root directory of your website. This means it should be accessible at `https://yourwebsite.com/robots.txt`. This is where search engine bots will look for it.
3. Use Correct Syntax
The syntax for robots.txt is simple but must be precise:
– `User-agent`: Specifies which bot the rule applies to.
– `Disallow`: Specifies the pages or directories to block.
– `Allow`: (Optional) Specifies pages or directories to allow if they fall under a broader `Disallow` rule.
4. Specify User-Agents
You can write rules for specific bots by naming them, like `googlebot` for Google’s bot. To apply a rule to all bots, use an asterisk (*).
5. Be Cautious with Disallow
Be careful with the `Disallow` directive to avoid accidentally blocking important parts of your site. For example, blocking `/` would prevent bots from indexing your entire site.
6. Use `Allow` for Exceptions
If you need to allow specific pages within a disallowed directory, use the `Allow` directive.
7. Regularly Review and Update
Your website may change over time, so regularly review and update your robots.txt file to reflect new content or structural changes. Outdated rules can misguide bots and affect your site’s indexing.
8. Test Your File
Always test your robots.txt file using tools like Google’s Robots Testing Tool. This helps you identify and fix any errors before they impact your site’s search engine indexing.
9. Don’t Block CSS and JS Files
Ensure that essential files like CSS and JavaScript are not blocked. These files help search engines understand and render your website correctly.
10. Combine with Meta Directives
While robots.txt is useful for blocking bots from entire directories or files, use meta directives (`noindex`) on individual pages when necessary. This combination provides more granular control over what gets indexed.
11. Document Changes
Keep a log of changes made to your robots.txt file. This helps track why certain rules were added and aids in troubleshooting any issues that arise later.
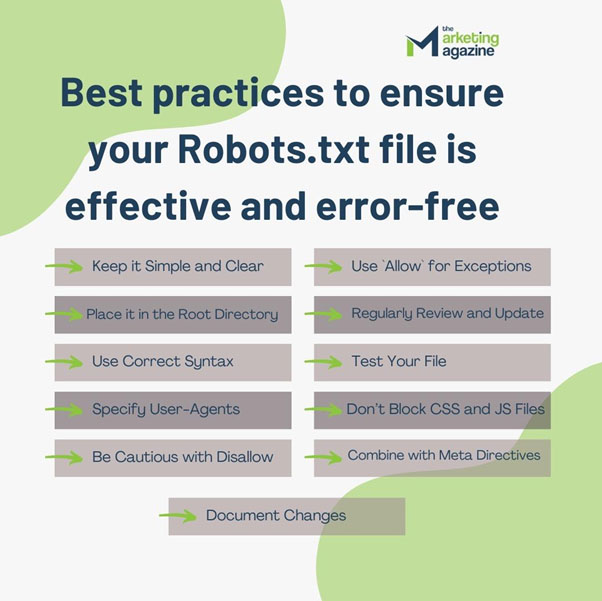
By following these best practices, you can effectively manage how search engines interact with your site, ensuring important content is indexed while keeping unwanted areas hidden from bots.
The process of creating a Robots.txt file
Sure! Let’s walk through the steps of creating a robots.txt file in more detail, using simple words and examples.
Step 1: Open a Text Editor
To create a robots.txt file, start by opening a text editor. This can be any basic text editor you have on your computer. Here are a few examples:
– TextEdit(on Mac, make sure to set it to plain text mode)
– Notepad++ or Sublime Text (for those who prefer code editors)
These programs let you write and edit plain text, which is all you need to create a robots.txt file.
Step 2: Write Your Rules
Once you have your text editor open, you’ll write your rules. These rules tell web crawlers what they can and cannot do on your website. There are two main parts to these rules:
- User-agent: This part specifies which web crawlers the rule applies to. For example, “Googlebot” is Google’s web crawler. You can use an asterisk (*) to apply the rule to all crawlers.
- Disallow: This part tells the web crawler which parts of your website it should not visit. If you want a crawler to ignore a specific folder or page, you list it here.
Here’s an example of a simple robots.txt file:

In this example:
– “User-agent: *” means the rule applies to all web crawlers.
– “Disallow: /private” and “Disallow: /temp” tell the crawlers not to visit any URLs that start with “example.com/private” or “example.com/temp”.
You can add as many rules as you need, depending on which parts of your website you want to restrict.
Step 3: Save the File
After writing your rules, save the file with the name “robots.txt”. When saving, make sure the file type is plain text. Here’s how:
– In Notepad, click “File” > “Save As”. In the “Save as type” dropdown, select “All Files”. Then, name your file “robots.txt” and click “Save”.
– In TextEdit on Mac, choose “Make Plain Text” from the “Format” menu before saving.
Step 4: Upload the File
Now, you need to upload your robots.txt file to your website’s root directory. This is the main folder where your website’s files are stored. Here’s how you can do it:
1. Using an FTP Client:
– Download and install an FTP client like FileZilla.
– Open FileZilla and connect to your website’s server using your FTP credentials (you can get these from your web hosting provider).
– Navigate to the root directory (often called “public_html” or “www”).
– Drag and drop your robots.txt file into this directory.
2. Using a File Manager in Your Hosting Account:
– Log in to your web hosting account.
– Find the file manager tool (most web hosts provide this).
– Navigate to the root directory.
– Upload the robots.txt file directly from there.
Conclusion
In conclusion, a robots.txt file is a simple yet powerful tool for managing how search engines and other web crawlers interact with your website. By creating this text file and placing it in the root directory of your site, you can control which parts of your site are indexed and which parts are kept private. This helps improve your site’s search engine performance by focusing crawlers on the most important pages and keeping sensitive or irrelevant information hidden. The process involves writing straightforward rules using a basic text editor and uploading the file to your web server. While it’s an easy task, it significantly impacts how your website is seen and indexed by search engines. This ensures a better-organized, more effective online presence.